
 In the last Staying Connected While Cruising post, I shared the details of our mobile phone plans and the differences between the two carriers as we traveled from Washington up through British Columbia, into Alaska, then down the Pacific Coast to California. This post will describe our experience in Mexico, Baja California specifically, as well as tips we’ve learned to make the most of our cellular data usage.
Baja California, Mexico
The last two months we’ve been sailing down the Pacific Coast side, around the cape, and up the Sea of Cortez of Baja California in Mexico. There are exactly two cellular carriers here, and only one you will ever connect to. TelCel. Movistar shows up once in a while, but in only one place (Bahia de Tortugas aka “Turtle Bay” was I successful in using it, and only for 5 minutes. Everywhere else, TelCel, which has 90% of the Mexico cellular market, is the one you will connect to. Here is where things get interesting, especially comparing the two US carriers roaming access.
In remote areas like Turtle Bay and Santa Maria Bay, both on outer tips of land on the Pacific Coast of Baja, there is no data available. The phone will register EDGE or 2G but the cellular tower itself does not actually have a connection to the Internet, so data is out, but phone calls and old style text message will work okay.
As you get closer to bigger cities you will get TelCel 3G which works quite well for Internet access on the phone and of course in the cities like Cabo, La Paz, and Loreto you will see LTE and get largely decent Internet speeds—- IF you are a T-Mobile customer. For Verizon customers it’s a strangely different story. Devon’s Verizon phone, which is the same model as mine, connects to the same exact TelCel 3G and LTE networks and has access to the Internet as well, but it is wholly slower compared to my phone. It’s a very dramatic and consistent difference that points to how Verizon and T-Mobile’s roaming contracts differ with TelCel. While both phones are still in their high speed LTE roaming allotment, the T-Mobile phone is way faster than the Verizon phone, and when the allotment is out, and both phones are being limited in speed by contract, the Verizon phone’s “2G” speed is practically useless, while the T-Mobile phone’s “256kbps speed” does work okay, but is certainly slow.
Technically, the reason for the difference is that TelCel uses different APNs (think of them as your internet router) for different roaming customers. So T-Mobile might use something like “tmointernet.itelcel.com” APN while Verizon customers might use “vzwinternet.itelcel.com” and the internet speeds for these are limited differently. These APNs are controlled by your SIM card and you can’t modify them in most cases because the carrier hides that setting in your phone.
Anyway, no matter the situation (both phones within LTE allotment or both phones past LTE allotment) the T-Mobile phone browses the Internet faster than the Verizon phone, (same iPhone 6S phones, same TelCel LTE network, same signal strength, same physical location.)
Winner: T-Mobile.. but wait, there’s more!
Getting the most from your data plan
Because WiFi is scarce in Mexico, and barely works when it IS available, we tend to use up our LTE speed allotment fairly easily when we have cellular service. That means for large portions of each month, we are limited to the non-LTE roaming speeds, which also affects the personal hotspot speeds when tethering our laptops to our phones.
Limiting Data Usage up front:
Mobile Devices (ie: iPhone/iPad)
1.) disable cellular access for any apps you absolutely don’t need to use. Settings->Cellular
Especially disable App Store to prevent app updates from automatically consuming your cellular data. If you make heavy use of Dropbox, Google Drive, OneNote, OneDrive, you should consider disabling those as well and only enabling them when you absolutely must sync them.
Absolutely disable the Photos app from accessing cellular. Best to sync to your laptop over USB instead or WiFi when you find a good network.
2.) disable background updating on Cellular entirely. Settings->General->Background App Refresh
This reduces the amount of data that apps will use when you aren’t actively using the app. I personally disabled this for WiFi as well since WiFi here in Mexico generally sucks so bad.
Note: there are similar settings for Android but since we don’t use Android devices, I am not familiar enough with them to provide advice.
3.) Try using Opera Mini on iOS to reduce data usage, and you can access websites like Facebook via a web browser (Opera for example), ignoring the “browse faster in the app” note from Facebook, because it’s actually the opposite. The Facebook app (and many others) transfer tons of background data that isn’t quite as necessary when you browse the website from a mobile web browser. In many situations, the web version is faster than the app.
Caveat: Some websites won’t load quite right in Opera Mini so YMMV.
Note: https://mbasic.facebook.com will take you to a very lightweight version of Facebook for mobile use.
Laptops and Personal Hotspots
Back in Alaska, we discovered that our laptops will automatically consume large amounts of Internet data in the background as soon as they find an Internet connection (like say through your phone hotspot) and can easily burn up your data plan in a matter of minutes on an LTE speed connection. We use Mac’s and between iCloud, Dropbox, Google Drive, Email, notifications, photos, app updates, and myriad other services, a single Mac can burn 500MB in 5 minutes once connected to WiFi before you even open a web browser. We discovered this as we sailed toward Ketchikan, AK as Devon connected her laptop to your Verizon phone hotspot and got a noticed from Verizon that her 500MB daily allotment was consumed just about 15 minutes later.
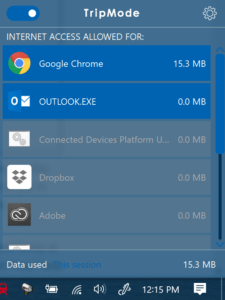 We found an excellent solution to this problem through an application called Trip Mode. Trip Mode allows you to control which applications and services on your computer can access the Internet at any given time and you can turn them each on and off with a simple click at any time. Trip Mode defaults to disabling everything when it is on and you can then selectively enable your web browser or other apps you need. Trip Mode also remembers wifi networks and let’s you save profiles of apps that may differ for the different networks, i.e.: more apps for known good WiFi networks, web browser only for mobile hotspots. Finally, TripMode automatically detects hotspot connections (as opposed to normal WiFi) and turns on automatically. Trip Mode is available for Mac and PC and I can tell you right now you absolutely need it. It isn’t expensive and it’s worth far more than it costs. It turns completely unusably slow and/or expensive internet connections into usable, manageable ones.
Note: if you tether an iOS device to another iOS devices (like an iPad to an iPhone, the connection is treated as Wifi, not Cellular, so most of the data limiting protections in the iOS device will not work to limit data. All you can really do in this case is disable Background App refresh and try to disable any automatic update features of the App Store and other services entirely. This will also hurt if you connect your iOS device to a slow WiFi network (which is all of them in Mexico) and want to actually use an app, the background updates will consume all of the Internet bandwidth available and you will get nowhere fast.
Honestly, the ability to limit app usage on WiFI in iOS is a major missing feature for those traveling outside the coverage of home WiFi and unlimited cellular networks.
TripMode works for Mac and PC and operates in largely the same way on both. If you are a Mac user, you have the additional option of a program called LittleSnitch. LittleSnitch costs $45 for one computer or $89 for a family pack license. It’s more powerful than TripMode, it can control what an application connects to, not just whether the app can connect at all. But it’s more expensive and is not available on PC. For Windows, the closest I have found to LittleSnitch is called NetLimiter and costs about $30 for a pro license. NetLimiter seems far more powerful than TripMode but also seems quite a bit more complicated. TripMode is very easy.
In a future post I am going to share with you a super secret squirrel tip for T-Mobile users that can drastically improve your Canada and Mexico roaming experience.
Att has a pretty extensive lte network in Mexico but they don’t let anyone else roam on it. It’s availabke in all the major cities you listed, speeds are typical us speeds and way better than southern ca. It also appears their unlimited plan in the us is about the same for Mexico – they slow speeds after about 20 gb. We also haven’t gotten any notices about roaming as we’re typivally on att towers down here and we’ve been in mex over 6 months (and yes we push the data cap limits). You can see their lte coverage areas on their website.
Great to know, thanks Jimmy!